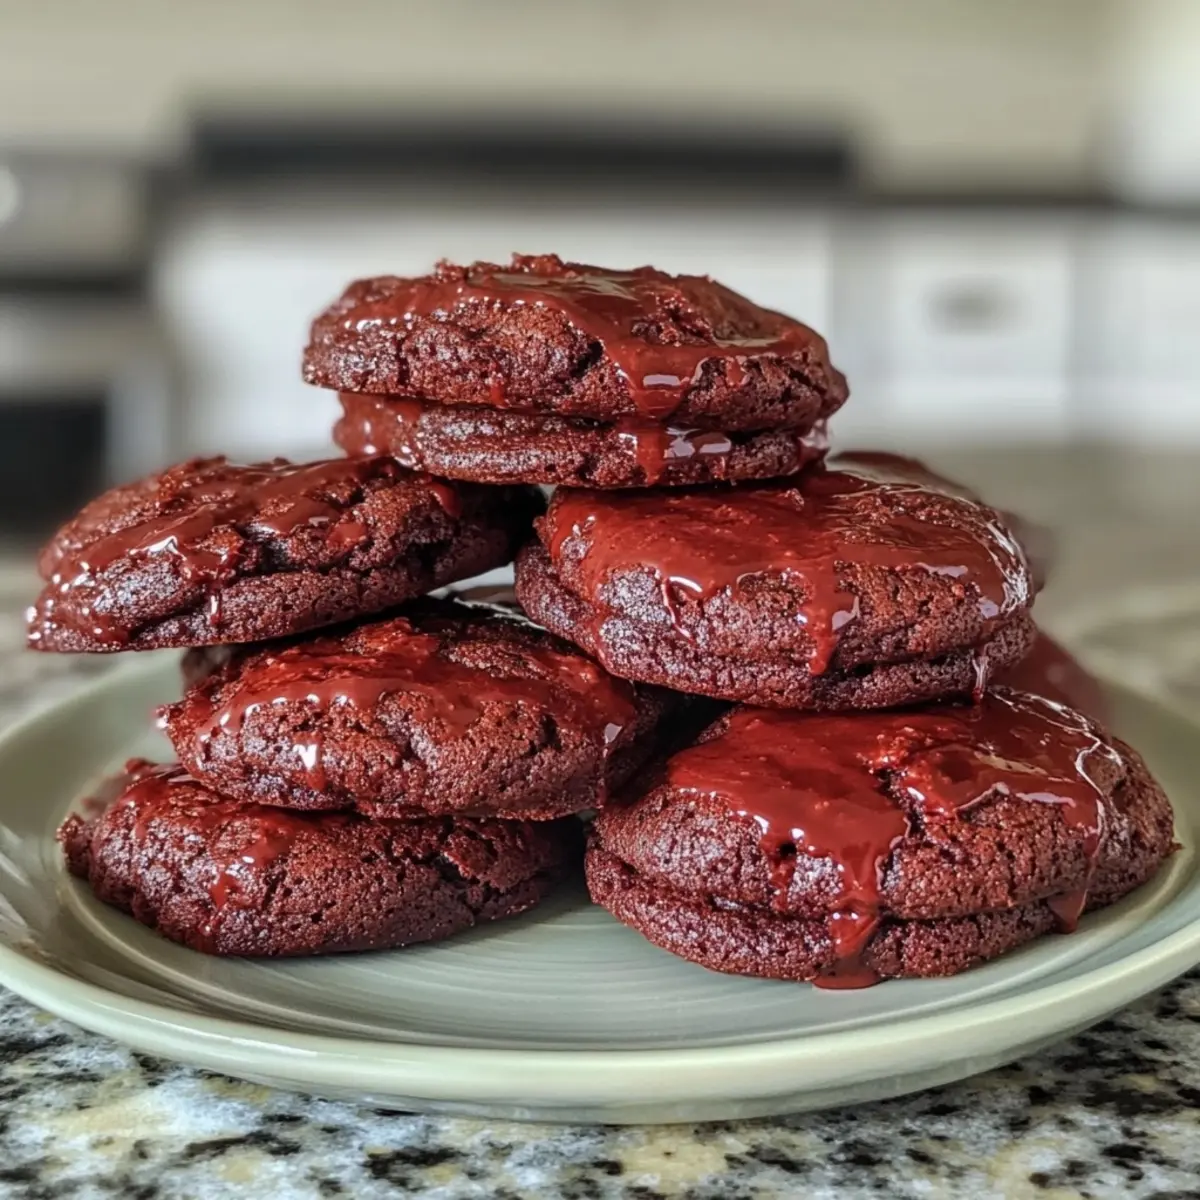
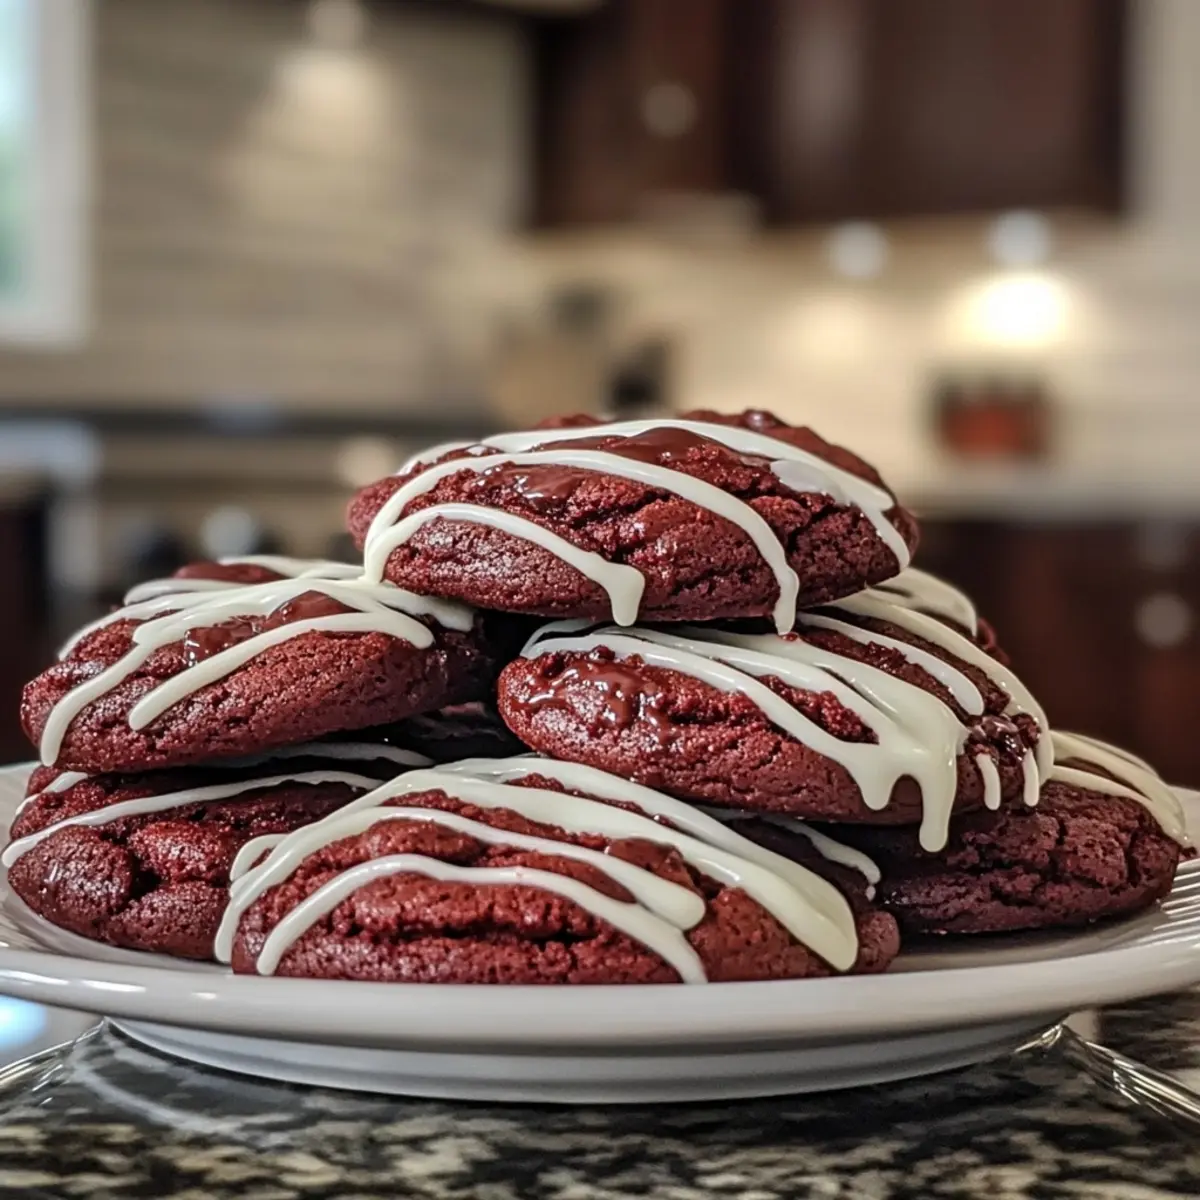
There’s nothing quite like the cozy aroma of freshly baked cookies wafting through the kitchen, and when those cookies are red velvet Oreo creations, the experience becomes truly unforgettable! Picture this: rich cocoa mingling with hints of vanilla, offering up a luscious treat that’s both festive and comforting. Inspired by a bit of kitchen spontaneity, I wanted to elevate the classic cookie experience with a creamy surprise—enter crushed Oreos.
These red velvet Oreo cookies strike the perfect balance between soft and chewy, presenting a delightful surprise in every bite. They’re not only visually stunning with their vibrant color but also incredibly easy to whip up, making them a fantastic addition to your holiday baking or a sweet treat for a cozy night in. Plus, with simple tweaks, they can be dairy-free or gluten-free, ensuring everyone can enjoy this flavor-packed indulgence. Let’s dive into the recipe and create some magic together!
Why love Red Velvet Oreo Cookies?
Irresistible, these cookies combine the classic allure of red velvet with the crunchy surprise of Oreos, creating a delightful fusion. Versatile, with easy substitutions for dairy-free or gluten-free versions, everyone can join in on the fun. Quick to make, these treats require minimal prep while delivering maximum flavor. Eye-catching, their vibrant color makes them perfect for festive occasions or any dessert table. Whether you’re sharing them with friends or enjoying a quiet evening, these cookies bring a smile with every bite! For additional inspiration, consider pairing them with delicious Coffee Brownies Frosting.
Red Velvet Oreo Cookies Ingredients
• Dive into the world of flavors with these delightful red velvet Oreo cookies!
For the Cookie Dough
- All-purpose flour – Provides essential structure; substitute with a gluten-free blend for a gluten-free option.
- Cocoa powder – Adds rich depth; dark cocoa can enhance flavor for a more intense treat.
- Baking soda – Acts as a leavening agent; ensure freshness for the best rise.
- Salt – Elevates the flavors; omit if following a strict low-sodium diet.
- Butter – Infuses richness and moisture; use plant-based butter for a dairy-free alternative.
- Granulated sugar – Sweetens the dough; consider reducing by ¼ cup for a lighter take.
- Brown sugar – Adds extra moisture and depth of flavor; typically no substitutions needed.
- Eggs – Binds the ingredients together; for vegan, try flax eggs or a commercial egg replacer.
- Vanilla extract – Enhances overall flavor; pure vanilla extract is preferred for richness.
- Red food coloring – Creates that signature vibrant hue; optional, since taste is the priority.
- Crushed Oreos – Adds delightful texture; use a rolling pin for easy crushing.
- White chocolate chips (optional) – Bumps up sweetness and texture; can be swapped for semi-sweet or dark chocolate chips.
For Optional Toppings
- Cream cheese frosting (optional) – Adds a luxurious finish; complements the cookies beautifully.
- Sprinkles (optional) – Brightens up the presentation for any festive occasion; go wild with your favorite colors!
These red velvet Oreo cookies are guaranteed to become a family favorite! Enjoy baking!
How to Make Red Velvet Oreo Cookies
- Preheat Oven: Set your oven to 350°F (175°C). While it’s heating, line a baking sheet with parchment paper to prevent sticking.
- Mix Dry Ingredients: In a medium bowl, whisk together the all-purpose flour, cocoa powder, baking soda, and salt until fully combined, creating a uniform dry mixture.
- Cream Butter and Sugars: In a large mixing bowl, beat the butter with granulated and brown sugars until the mixture is light and fluffy, a process that takes about 3-5 minutes.
- Incorporate Eggs and Vanilla: Add in the eggs and vanilla extract to the butter-sugar mix, mixing until well combined. The mixture should be smooth and creamy.
- Combine Mixtures: Gradually add the dry ingredients to the wet mixture, stirring until just combined. Take care not to overmix to keep the cookies soft and chewy!
- Fold in Oreos: Gently fold in the crushed Oreos and white chocolate chips (if using), ensuring they are evenly distributed throughout the cookie dough.
- Form Cookies: Using a cookie scoop or tablespoon, scoop portions of dough onto the prepared baking sheet, leaving space between each mound for spreading.
- Bake: Place in the oven and bake for 10-12 minutes, or until the edges are set but the centers are still soft.
- Cool: Allow the cookies to cool on the baking sheet for about 5 minutes before transferring them to a wire rack to cool completely.
Optional: Drizzle with cream cheese frosting for an extra delightful finish!
Exact quantities are listed in the recipe card below.
Expert Tips for Red Velvet Oreo Cookies
- Chill the Dough: Refrigerating the cookie dough for 30 minutes helps prevent spreading, resulting in thicker, chewier red velvet cookies.
- Measure Flour Correctly: Spoon and level your flour instead of scooping it directly from the bag to avoid dense cookies.
- Don’t Overmix: Gently mix wet and dry ingredients until just combined. Overmixing can lead to tough cookies instead of soft and chewy ones.
- Visual Cues: Bake until the edges are set and the centers look slightly underbaked; they will continue to cook as they cool.
- Adjust the Sugar: If you prefer a less sweet cookie, consider reducing granulated sugar by up to ¼ cup without affecting texture.
Storage Tips for Red Velvet Oreo Cookies
Room Temperature: Store cookies in an airtight container at room temperature for up to 5 days to maintain freshness and prevent drying out.
Fridge: If your kitchen is warm, you can refrigerate them for about 7 days, but allow them to come to room temperature before enjoying for the best texture.
Freezer: Freeze unbaked dough balls for up to 3 months—just scoop the dough and freeze them on a baking sheet. Once frozen, transfer to a zip-top bag for easy baking whenever you’re craving these red velvet cookies!
Reheating: For warmed cookies, simply pop them in the microwave for 10-15 seconds, and enjoy the gooey texture brought back to life.
Make Ahead Options
These Red Velvet Oreo Cookies are perfect for meal prep enthusiasts! You can prepare the cookie dough up to 24 hours in advance by mixing all your ingredients and storing the dough in an airtight container in the refrigerator. This enhances the flavors and ensures extra softness. If you’re short on time, you can also scoop the dough into individual portions and place them on a baking sheet, then cover and refrigerate for up to 3 days. When you’re ready to bake, simply pop the chilled dough into a preheated oven and bake as directed, allowing for just a few extra minutes if baking straight from the fridge. Enjoy the beautifully soft and chewy cookies that are still just as delicious!
Red Velvet Oreo Cookies Variations
Embrace your creativity in the kitchen and transform these delightful cookies into something uniquely yours!
- Dairy-Free: Use plant-based butter and coconut milk-based chocolate chips for a creamy, dairy-free delight.
- Gluten-Free: Swap all-purpose flour with a 1:1 gluten-free blend to ensure everyone can savor these sweet treats.
- Chocolate Overload: Mix in mini chocolate chips for an extra rich cookie experience that chocolate lovers will adore.
- Nutty Twist: Incorporate chopped pecans or walnuts into the cookie dough for added crunch and a delightful contrast in texture.
- Mint Chocolate: Add peppermint extract and some crushed Andes mints for a refreshing take on your red velvet cookies.
- Spicy Kick: Include a pinch of cayenne pepper or a dash of cinnamon for an unexpected and exciting flavor twist.
- Frosted Variation: Top the cookies with a swirl of cream cheese frosting to elevate their sweetness and create a decadent dessert masterpiece.
- Rainbow Surprise: Fold in colorful sprinkles for a festive flair, making these cookies perfect for celebrations or gatherings!
What to Serve with Delicious Red Velvet Oreo Cookies?
There’s nothing quite like a cozy gathering filled with sweet delights to uplift the spirit and create memorable moments.
- Vanilla Ice Cream: The creamy texture melts beautifully against the rich flavors of the cookies, providing a classic and comforting pairing.
- Chocolate Milkshake: A deliciously indulgent drink, the chocolate shake complements the rich cocoa in the cookies while bringing a fun, nostalgic feel.
- Whipped Cream Topping: Light and fluffy, this addition enhances the cookies’ sweetness without overpowering their unique red velvet flavor.
- Coffee: A warm cup of joe pairs perfectly by balancing the cookie’s sweetness with a toasted depth that elevates every bite. The light bitterness enhances those rich flavors, creating a perfect harmony.
- Fresh Berries: Strawberries or raspberries add a refreshing burst of tartness, cutting through the richness and bringing a pop of color to your dessert table.
- Cream Cheese Frosting: Spread a thin layer on top for an extra creamy finish that emphasizes the cookies’ delightful red velvet essence, making each bite even richer.
Pair these delightful treats with your favorite options to create a dessert experience that your family and friends will savor!

Delicious Red Velvet Oreo Cookies Recipe FAQs
What is the best way to select ripe ingredients?
Absolutely! For the best results, choose ingredients that are fresh and at their peak. With the butter, make sure it’s softened but not melted, similar to the texture of creamy peanut butter. If using eggs, ensure they are fresh—check the expiration date on the carton to prevent any undesirable flavors. As for the crushed Oreos, use those that are freshly opened, as they maintain better texture and flavor.
How should I store leftover cookies, and how long do they last?
Very good question! Keep your red velvet Oreo cookies in an airtight container at room temperature for up to 5 days. If you’re in a warm climate or have concerns about freshness, you can refrigerate them for an additional 7 days. Just let them come back to room temperature for the best flavor before indulging.
Can I freeze the cookie dough or baked cookies?
Absolutely! For freezing cookie dough, scoop out dough balls and freeze them on a baking sheet until solid; then transfer to a zip-top bag. This will keep unbaked dough fresh for up to 3 months. When ready to bake, simply place the frozen balls on a baking sheet and add an extra minute or two to your baking time. If you want to freeze baked cookies, allow them to cool completely, then store in an airtight container or freezer bag for about 3 months—just reheat them in the microwave when you’re ready to enjoy!
What should I do if my cookies turn out too hard?
If you find your cookies are harder than expected, there could be a few culprits at play. Ensure you’re accurately measuring your flour—too much can make them dense. Also, check that you’re not overmixing and that you’re pulling them out of the oven when they are just set at the edges. If you want a second chance, you can place a slice of bread in the container with the cookies to help soften them over time due to the moisture.
Are these cookies safe for my pets or anyone with allergies?
I often recommend caution regarding pets. These cookies contain chocolate, which can be toxic to dogs, so be sure to keep them out of reach! For those with allergies, substituting ingredients is possible—using a gluten-free flour blend and plant-based butter works great for those who might have gluten or dairy sensitivities. Just ensure to read labels to be sure everything is safe for your specific dietary needs!

Irresistibly Chewy Red Velvet Brownie Cookies You’ll Love
Equipment
- Oven
- Mixing Bowls
- Whisk
- Cookie Scoop
- Baking Sheet
- Parchment Paper
Ingredients
For the Cookie Dough
- 2 cups All-purpose flour Substitute with a gluten-free blend for a gluten-free option
- ¾ cup Cocoa powder Dark cocoa can enhance flavor
- 1 teaspoon Baking soda Ensure freshness for the best rise
- ½ teaspoon Salt Omit if following a strict low-sodium diet
- ½ cup Butter Use plant-based butter for dairy-free
- 1 cup Granulated sugar Consider reducing by ¼ cup for a lighter cookie
- ½ cup Brown sugar Typically no substitutions needed
- 2 large Eggs For vegan, try flax eggs or an egg replacer
- 1 teaspoon Vanilla extract Pure vanilla extract is preferred
- 1 tablespoon Red food coloring Optional, since taste is the priority
- 1 cup Crushed Oreos Use a rolling pin for easy crushing
- ½ cup White chocolate chips Optional, can swap for semi-sweet or dark chocolate
For Optional Toppings
- 1 cup Cream cheese frosting Optional, adds a luxurious finish
- Sprinkles Optional, go wild with your favorite colors!
Instructions
How to Make Red Velvet Oreo Cookies
- Preheat your oven to 350°F (175°C) and line a baking sheet with parchment paper.
- In a medium bowl, whisk together the all-purpose flour, cocoa powder, baking soda, and salt until fully combined.
- In a large mixing bowl, beat the butter with granulated and brown sugars until light and fluffy, about 3-5 minutes.
- Add in the eggs and vanilla extract, mixing until well combined.
- Gradually add the dry ingredients to the wet mixture, stirring until just combined.
- Gently fold in the crushed Oreos and white chocolate chips, ensuring even distribution.
- Using a cookie scoop, drop portions of dough onto the prepared baking sheet, leaving space for spreading.
- Bake for 10-12 minutes, or until the edges are set but centers are still soft.
- Allow cookies to cool on the baking sheet for about 5 minutes, then transfer to a wire rack to cool completely.
Notes